Hello Coders, Today we are going to learn what is AEM ? How can we setup environment for AEM development and what are the benefits of using AEM ?.
I’ll try to explain each and every aspect so that you will be ready to rock in AEM. So lets start the journey.
What is AEM ?
Simply, whenever you try to search something about AEM(Adobe Experience Manager) then one word is always came first and that is CMS. So AEM is CMS(Content Management System) which is use for developing enterprise level of web applications, Mobile Applications and Forms. AEM is so powerful for developing large websites and Mobile Applications. AEM is a product of Adobe so they are more focus on design part and as we know that if a website looks good then everything is good.
AEM have many pre components for many tough work so that you can easily import the component in your pages. AEM always respect responsiveness, So they basically never implement any components which is not responsive.
Whenever we start developing websites and mobile applications from scratch then there can be many problems arises, like maintaining responsiveness, maintaining good architecture, Creating some code which is common for all websites. But, at the same time when we use CMS for developing any applications then we get rest from all the above problems and get a good architecture for maintaining the applications.
AEM is very well and powerful tool which used java as a programming language for backend development. Developing and maintaining a application is easy so that you can more focus on your creativity. AEM makes it easy to manage your marketing content and assets.
Skill Required For AEM Developer
- Java
- JSP Servlet
- Sling
- Html/Css
- Javascript (node react and jquery) for better UI design
How Can We Set Up The AEM Environment For AEM Web Development ?
These thing are required to start developing AEM websites and testing in your local server
- Java JDK
- Local AEM instances (SDK)
- Apache Maven project
- Install Integrated Development Environments (IDE) : Preferred Visual Studio
- node(nvm), NPM
1) Java JDK
Why it is required because AEM basically use java for their backend implementation as a programming language
you need to install jdk for java environment click here
Set Environment Variables:
Under System variables create new
Variable Name: JAVA_HOME
Variable value: C:\Program Files\Java\jdk-11.0.11 (your install java location)
Now Add Path:
Click on path and then click on Edit

Again click new and paste your java path

2) Local AEM instances
For developing AEM websites we need a local AEM setup like instances. So when we refer to a local AEM instance, we are talking about a copy of Adobe Experience Manager that is running on a developer’s personal machine. All AEM development should start by writing and running code against a local AEM instance.
So if you are learning AEM from scratch and you are in early phase then you need to understand that there are two local instances that are: author and publish.
The Author runmode is the environment that digital marketers will use to create and manage content. When developing most of the time you will be deploying code to an Author instance. This allows you to create new pages as well as add and configure components. AEM Sites is a WYSIWYG authoring CMS and therefore most of the CSS and JavaScript can be tested against an authoring instance.
There will be two area for any AEM sites that are Author and Publish, In Author all the development process is proceeding while in publish mode we check the user-end for finally working the AEM site pages and websites.
Steps
- Ensure Java is installed.
- Prefer Java JDK 11 for AEM 6.5+
- Java JDK 8 for AEM versions prior to AEM 6.5
- Get a copy of the AEM QuickStart Jar and a license.properties.
- Create a folder structure on your computer like the following:
~/aem-sdkunder this folder create two folder like:
/author
/publish- Rename the QuickStart JAR to aem-author-p4502.jar and place it beneath the
/authordirectory. Add the license.properties file beneath the/authordirectory. - Make a copy of the QuickStart JAR, rename it to aem-publish-p4503.jar and place it beneath the
/publishdirectory. Add a copy of the license.properties file beneath the/publishdirectory.
Now your file structure is look like this:
~/aem-sdk
    /author
        + aem-author-p4502.jar
        + license.properties
    /publish
        + aem-publish-p4503.jar
        + license.properties
Double-click the aem-author-p4502.jar file to install the Author instance. This will start the author instance, running on port 4502 on the local computer. You can use CMD ( java -Xmx1024m -jar aem-author-p4502.jar -gui )
Double-click the aem-publish-p4503.jar file to install the Publish instance. This will start the Publish instance, running on port 4503 on the local computer. You can use CMD ( java -Xmx1024m -jar aem-author-p4503.jar -gui )
3) Install Apache Maven
Installing maven is compulsory tool, Because to manage build and deployment of java based projects we need maven. AEM is a Java-based platform and Maven is the standard way to manage code for an AEM project. When we say AEM Maven Project or just your AEM Project, we are referring to a Maven project that includes all of the custom code for your site.
Steps
- Download Apache Maven
- Install Apache Maven and ensure that the installation has been added to your command-line
PATH.- macOS users can install Maven using Homebrew
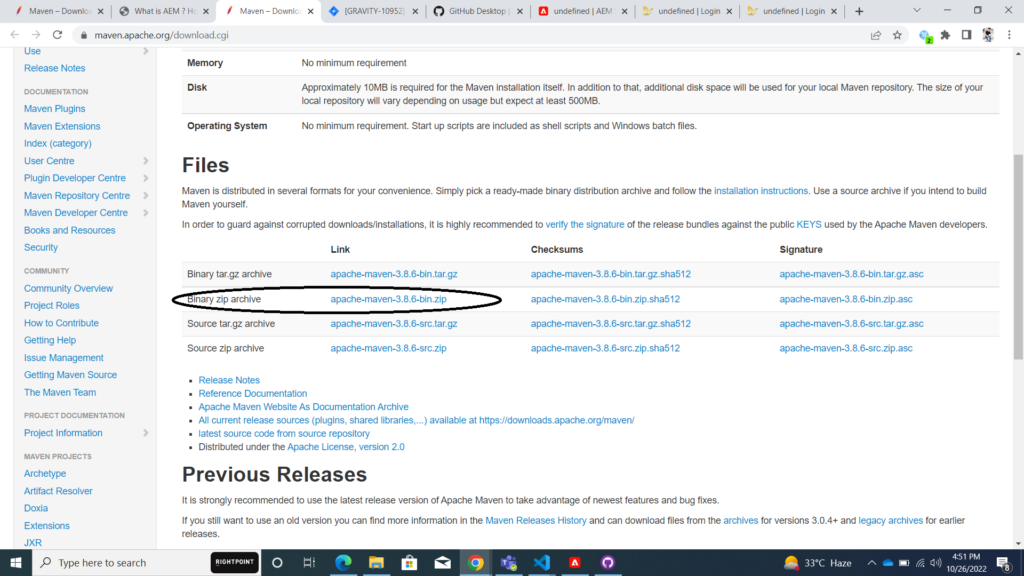
Extract the file and copy the folder and it anywhere( better is to paste it under and maven folder )
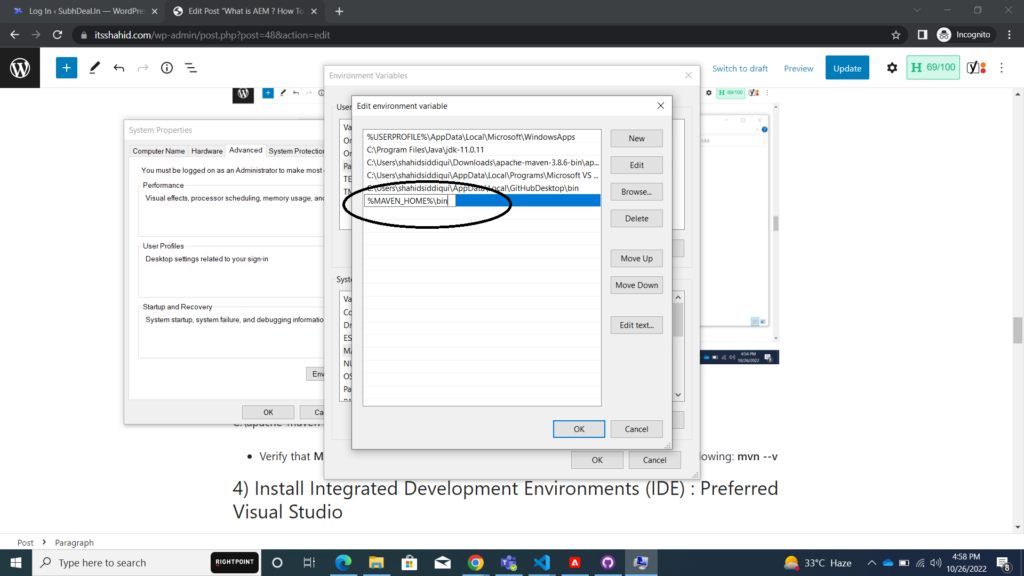
Set Environment Variables:
Under System Variables
Put the values as below image
Variable name: MAVEN_HOME
Variable value: C:\apache-maven-3.8.6

Add Path:
- Verify that Maven is installed by opening a new command Prompt and executing the following: mvn –v
4) Install Integrated Development Environments (IDE) : Preferred Visual Studio
I am using Visual Studio IDE for AEM Development and I recommend Visual Studio you too. Some important Extension should be install in Visual Studio for AEM development. Click here for extension details
5) node(nvm), NPM
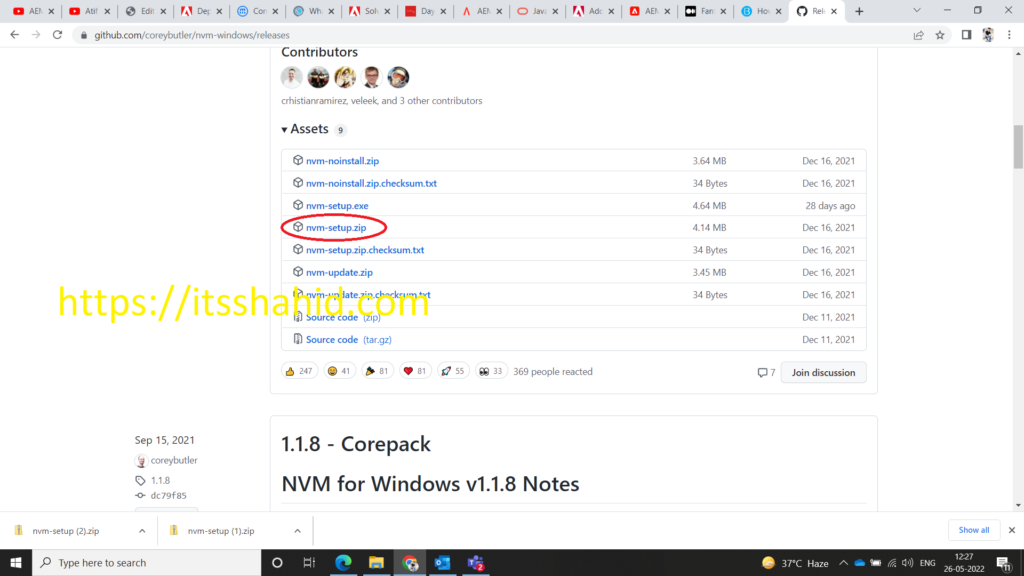
- Download nvm.
In order to install Node Version Manager tool in Windows environment we need to download a zip file that contains the installation wizard. - Install nvm.
Go to your Downloads folder on Windows, and unzipnvm-setup.zipfile and double click onnvm-setup. - Installation Wizard.
When the installation wizard opens, hit the next button a bunch of times, and at the end you will see an install button that you will hit too. After that, just wait for the progress bar to finish.
☝ ?? Remember not to touch any default configuration. Always keep hitting next!!!
- Command Prompt.
Once it is installed, open Windows Command Prompt. If you have any issues finding the command line, just type CMD in Windows search bar at the bottom-left corner of your desktop. - Install node version 8 or whatever version you want.
In the command prompt type the command below. If you want to check what are the current node versions, you can go to nodejs.org and check all of them. I would recommend using the recommended for most users.
nvm install 8.15.0Hurrah, Now you are good to go with AEM Projects
How To Create New Project In AEM ?
- Open CMD in your specific location
- Run This command : mvn -B org.apache.maven.plugins:maven-archetype-plugin:3.2.1:generate -D archetypeGroupId=com.adobe.aem -D archetypeArtifactId=aem-project-archetype -D archetypeVersion=35 -D appTitle=”WKND Sites Project” -D appId=”wknd” -D groupId=”com.adobe.aem.guides” -D artifactId=”aem-guides-wknd” -D package=”com.adobe.aem.guides.wknd” -D version=”0.0.1-SNAPSHOT” -D aemVersion=”cloud” . Here, in the command we have highlight some text in bold which is need to change as your project requirement
- Start your AEM Instance
- Open Project In IDE
- Run This command for clearing the project: mvn clean install -PautoInstallSinglePackage
- Now you can edit site using aem server localhost:4502
Benefit Of AEM CMS for Enterprise Businesses
Some Benefits are:
- Easier integration with other marketing tools
- Automation of metadata and content tag designation
- Ready-made components
- Developer-driven customization
- Centralized environment
- Scalability
- Workflows for content management
- Content personalization for different groups of website visitors.
- Security
AEM is not only CMS But it’s more than a mere CMS; it’s a sales and analytical engine that can shine when you combine all its benefits into a workable site. Outlining the AEM CMS advantages, it is clear that this CMS tool serves as a great resource for enterprises looking for easy integration, automation, scalability, and security.
Most important AEM allows you to create custom variations of your assets which can be integrated with Creative Cloud to create efficient workflows and deliver consistent content experiences. You can manage your assets from the cloud, design assets creation workflows, and automatically assign metadata and tags for all assets.